Adaptive Cards to Email through MS Graph (Actionable messages)
Demonstrating how to send an approval adaptive card (Actionable messages) through MS Graph
Prerequisites
- App registration/service principal with correct permissions
- Token for MS Graph
- Permissions on the endpoint you are using
For all the below examples, the variable $baseUrl will always be “https://graph.microsoft.com/v1.0”
Introduction to Adaptive Cards
Adaptive Cards are a way to present and collect information in a consistent way across different platforms. Adaptive Cards can be used in various scenarios, such as sending approval requests, collecting feedback, or displaying information.
Setting up Your Application Permissions
To send adaptive cards through MS Graph, you need to set up your application with the correct permissions. Ensure that your app registration/service principal has the following permissions:
Mail.SendUser.Read.All
You can set these permissions in the Azure portal under your app registration’s API permissions.
For this example we will use a logic app to receive our responses from adaptive cards so go ahead and create this first - Part 1
Depending on your use case and cost, choose the hosting option that best suits your scenario. For this example we are using Consumption - Multi-tenant. Fully managed and easy to get started.
Once created go to the resource and go into the Logic app designer press Add a trigger and choose Request and When a HTTP request is received
If you want to use 1 app to handle all responses leave the Method as is (This is what we will use in this example) Note that this is also easier than having to create multiple providers
Press on Save and copy the url from the HTTP URL we will need this for the next section on setting up your provider
That is it for now we will get back to the logic app later on
Setting up your provider for actionable messages
First off, before we are able to send an actionable message, we need to set up a Provider in the “Actionable Email Developer Dashboard”
- Actionable Email Developer Dashboard https://outlook.office.com/connectors/oam/publish
- Note you might have to have outlook on the web open first
- Note that either your Exchange Administrator or Global administrator has to approve this provider before you can use it
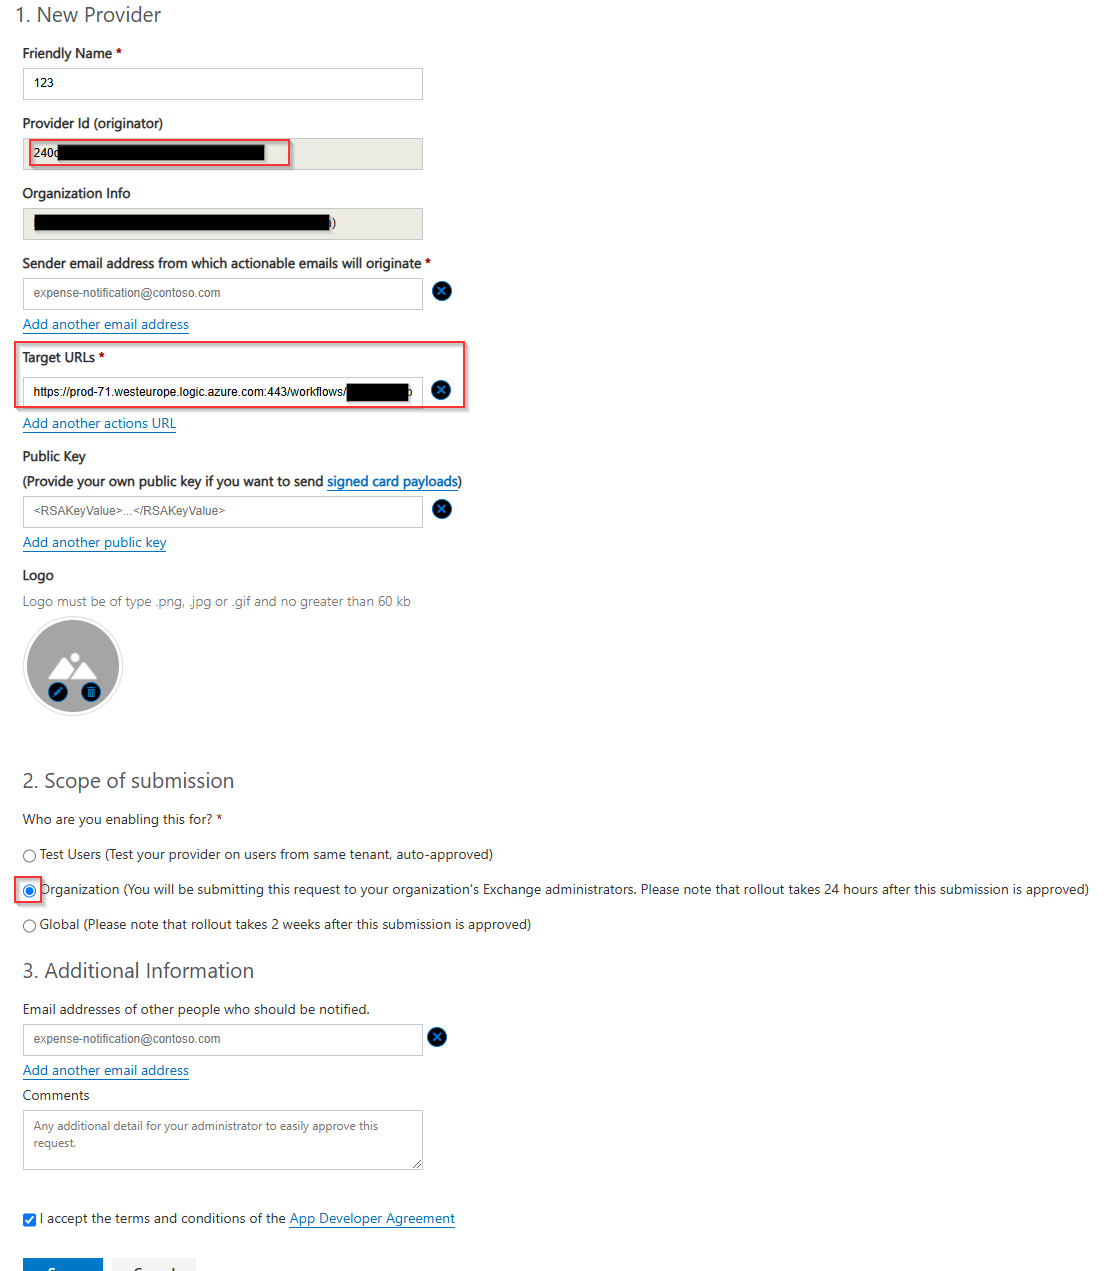
Click the “New Provider”
Here you will need to setup the following as a minimum: None of these settings can be changed later, you will need to create a new provider if you need any changes made.
- Friendly Name (Any name you would like to use for the provider, I would recommend calling it something that makes sense to what you are doing)
- Sender email address from which actionable emails will originate (This is the email that will be used to send your actionable message can be multiple emails)
- Who are you enabling this for? (If you are just testing then just chose Test Users) and set the emails in the Test user email addresses seperated with “;” The test scenario will be auto-approved but can also only be used for the users that you specify. For production use case use the
Organization - Checkmark in “I accept the terms and conditions of the”
After you have filled in minimum requirements press on save If you have selected Organization you will need your exchange administrator or global administrator to approve it and the requst can be seen by them on the below url
https://outlook.office.com/connectors/oam/admin
Once approved copy the Provider Id (originator) as we will need this for when we are sending our actionable messages
Designing Your Actionable Messages
Adaptive Cards are designed using JSON. The easiest way to design an actionable message is by doing it on the below link, where you also will be able to send a test to your own email:
- Now the official link for designing actionable messages is:
- https://amdesigner.azurewebsites.net/
But I have found that more often than not, that the actionable message created from this does not work like it should. Instead I would recommend going with
https://adaptivecards.io/designer/
And set the Select host app: to Outlook Actionable Messages and the Target version to 1.2
Here is an example of an adaptive card:
1
2
3
4
5
6
7
8
9
10
11
12
13
14
15
16
17
18
19
20
21
22
23
24
25
26
27
28
29
30
31
32
33
34
35
36
37
38
39
40
41
42
43
44
45
46
47
48
49
50
51
52
53
54
55
56
57
58
59
60
61
62
{
    "type": "AdaptiveCard",
    "version": "1.2",
    "originator": "$($originatorId)",
    "hideOriginalBody": true,
    "body": [
        {
            "type": "ColumnSet",
            "bleed": true,
            "columns": [
                {
                    "type": "Column",
                    "width": "auto",
                    "items": [
                        {
                            "type": "Image",
                            "url": "$(photo)",
                            "altText": "Profile picture",
                            "size": "Small",
                            "style": "Person"
                        }
                    ]
                },
                {
                    "type": "Column",
                    "width": "stretch",
                    "items": [
                        {
                            "type": "TextBlock",
                            "text": "Hi $(name)!",
                            "size": "Medium"
                        },
                        {
                            "type": "TextBlock",
                            "text": "Here's a bit about your org...",
                            "spacing": "None"
                        }
                    ]
                }
            ]
        },
        {
            "type": "TextBlock",
            "text": "Your manager is: **$(manager.name)**"
        },
        {
            "type": "TextBlock",
            "text": "Your peers are:"
        },
        {
            "type": "FactSet",
            "facts": [
                {
                    "$data": "$(peers)",
                    "title": "$(name)",
                    "value": "$(title)"
                }
            ]
        }
    ],
    "$schema": "http://adaptivecards.io/schemas/adaptive-card.json"
}
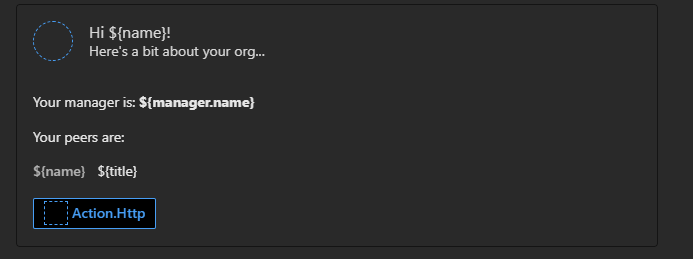
Example of the email test:
Sending Your Adaptive Cards through MS Graph
To send an adaptive card through MS Graph, you need to include the card JSON in the body of an email message. Here is an example of how to do this using PowerShell: *Personally for these kinds of things I like to include it just as a JSON string copy pasted from the amdesigner as it makes it easy to view the example on the site by pasting it in there, but you could also build it using powershell. For this post we will just do it with JSON copy paste *
1
2
3
4
5
6
7
8
9
10
11
12
13
14
15
16
17
18
19
20
21
22
23
24
25
26
27
28
29
30
31
32
33
34
35
36
37
38
39
40
41
42
43
44
45
46
47
48
49
50
51
52
53
54
55
56
57
58
59
60
61
62
63
64
65
66
67
68
69
70
71
72
73
74
75
76
77
78
79
80
81
82
83
84
85
86
87
88
89
90
91
92
93
94
95
96
97
98
99
100
101
102
103
104
105
106
107
108
109
110
111
112
113
114
115
116
117
118
119
120
121
122
123
124
125
126
127
128
129
130
131
132
133
134
135
136
137
138
139
140
141
# Originator id
$originatorId = "123546879"

# Your url for the logic app saved from earlier the same one used for the `HTTP URL` for mine it looks something like this
$httpURL = "https://prod-71.westeurope.logic.azure.com:443/workflows/{workflowid}/triggers/When_a_HTTP_request_is_received/paths/invoke?api-version=2016-10-01&sp=%2Ftriggers%2FWhen_a_HTTP_request_is_received%2Frun&sv=1.0&sig={sig}"

# Example values for other variables
$photo = "https://example.com/photo.jpg"
$name = "John Doe"
$manager = @{
    name = "Jane Smith"
}
$peers = @(
    @{
        title = "Alice Johnson"
        value = "Software Engineer"
    },
    @{
        title = "Bob Brown"
        value = "Product Manager"
    }
)

$params = @{
    message         = @{
        subject      = "Some org information"
        body         = @{
            contentType = "HTML"
            content     = @"
        <html>
        <head>
            <meta http-equiv="Content-Type" content="text/html; charset=utf-8">
            <script type="application/adaptivecard+json">
{
    "type": "AdaptiveCard",
    "version": "1.2",
    "originator": "$($originatorId)",
    "hideOriginalBody": true,
    "body": [
        {
            "type": "ColumnSet",
            "style": "accent",
            "bleed": true,
            "columns": [
                {
                    "type": "Column",
                    "width": "auto",
                    "items": [
                        {
                            "type": "Image",
                            "url": "$($photo)",
                            "altText": "Profile picture",
                            "size": "Small",
                            "style": "Person"
                        }
                    ]
                },
                {
                    "type": "Column",
                    "width": "stretch",
                    "items": [
                        {
                            "type": "TextBlock",
                            "text": "Hi $($name)!",
                            "size": "Medium"
                        },
                        {
                            "type": "TextBlock",
                            "text": "Here's a bit about your org...",
                            "spacing": "None"
                        }
                    ]
                }
            ]
        },
        {
            "type": "TextBlock",
            "text": "Your manager is: **$($manager.name)**"
        },
        {
            "type": "TextBlock",
            "text": "Your peers are:"
        },
        {
            "type": "FactSet",
            "facts": $($peers | convertto-json)
        },
        {
            "type": "ActionSet",
            "actions": [
                {
                    "type": "Action.Http",
                    "title": "Action.Http",
                    "id": "1",
                    "iconUrl": "",
                    "method": "POST",
                    "body": "{reason:12134}",
                    "url": "$($httpURL)",
                    "headers": [
                        {
                            "name": "Authorization",
                            "value": ""
                        },
                        {
                            "name": "Content-type",
                            "value": "text/plain"
                        }
                    ]
                }
            ]
        }
    ],
    "`$schema": "http://adaptivecards.io/schemas/adaptive-card.json"
}
        </script>
        </head>
        <p>Some org information</p>
        </html>
"@
        }
        toRecipients = @(
            @{
                emailAddress = @{
                    address = "bob@example.com"
                }
            }
        )

    }
    saveToSentItems = "false"
}

# Graph API BASE URI
$baseUrl = "https://graph.microsoft.com/v1.0"
$uri = "$baseUrl/users/{id | userPrincipalName}/sendMail"

# Sending the email with the adaptive card
$response = Invoke-RestMethod -Method Post -Uri $uri -Headers $authHeaders -Body $params

# Display the response
$response
Handling Response of Adaptive Cards
When a user interacts with an adaptive card, the response is sent back to your service. You need to set up an endpoint to handle these responses. In our example we are using logic apps. The response will contain the data specified in the ActionSet.
Here is an example of handling the response in a logic app:
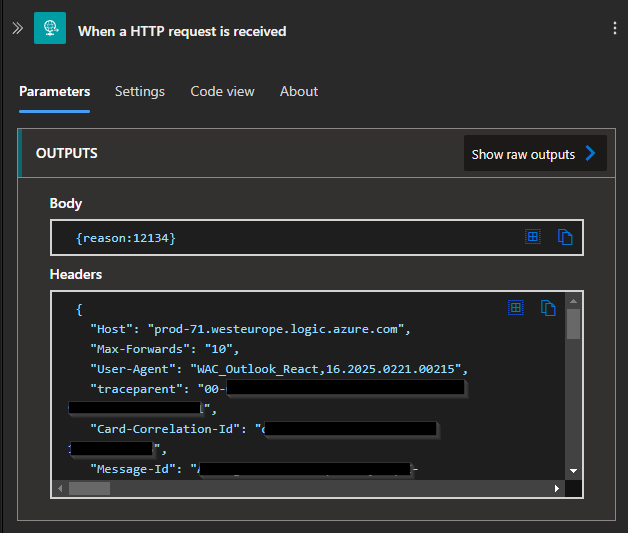
By default the Headers section includes a lot of information about the adaptive card sent to the user along with a bearer token from the user, which we could unpack in order to see who it came from. And our body is by default set to send whatever we supplied in the body of our action.http in our action set.
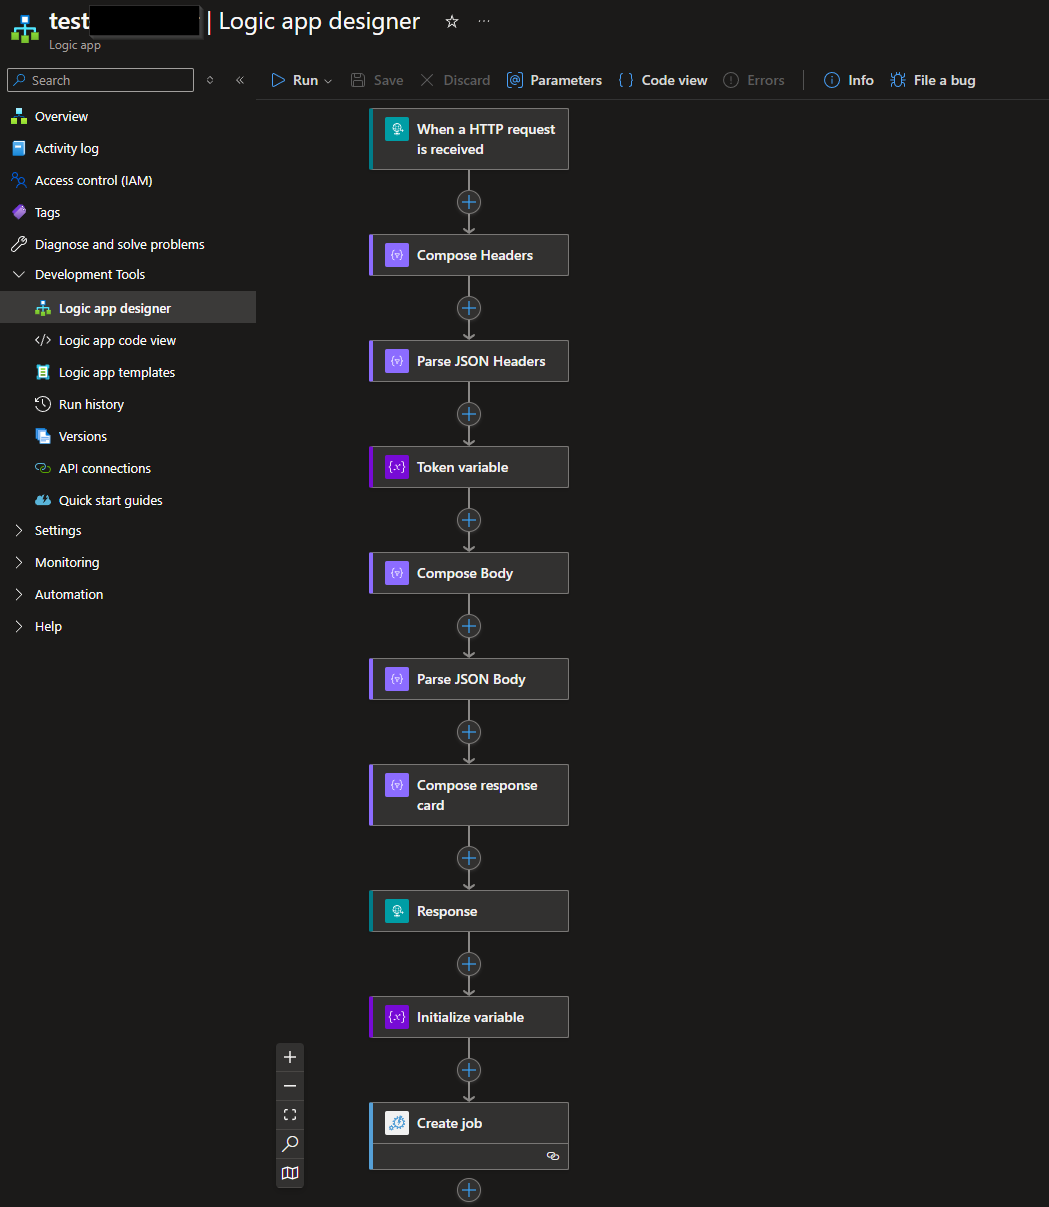
To handle these situations we need to go back to our logic app and go into the logic app designer. For this example our final result will look something like this:
And to go over each setting, first we are receiving a HTTP request with all the data, after that we first need to add an action called Compose and our input for this one will be Headers. This is needed before we can go through the JSON data. Next we are going to Parse the JSON in our headers with an action called ParseJson, and for this one our Content input will be the output from our Compose Headers and our schema can be auto generated by using a sample payload like shown here:
First make a run of your adaptive card and send it to the email and make an actual submit on this one. Once that is done you should see some data in your logic app
Click and open the job and open/click on the When a HTTP request is received
Here you have your Headers and Body seperated, copy them both to a notepad. Go back into the logic app designer and go to the Parse JSON Headers, and here you are able to click on Use sample payload to generate schema. Paste in the data from your Headers and the Schema is created for you. Now since in my case I would like to use the Token from the headers, specifically the property Action-Authorization in the headers, we need to do what is called InitializeVariable. For this one we give it a name, in my example I will use the name Token set the type to a String, and then I will click inside the value field and select the small lightning, which references to an earlier defined resource, click on see more on the one called Parse JSON and you should be able to select Body Action-Authorization.
Next up is the body and you can follow the same step as above in regards to the compose and parse of JSON.
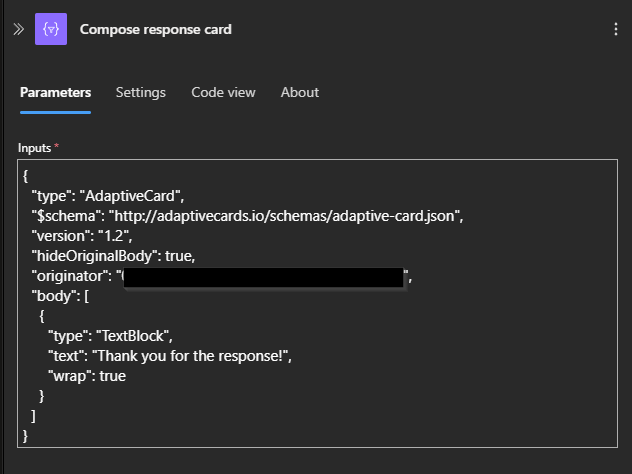
Next since we do not want to receive multiple responses on the same adaptive card, we will need to make an update of the adaptive card in the users outlook. This can be done by making a new compose and include the inputs of a new adaptive card example:
1
2
3
4
5
6
7
8
9
10
11
12
13
14
{
  "type": "AdaptiveCard",
  "$schema": "http://adaptivecards.io/schemas/adaptive-card.json",
  "version": "1.2",
  "hideOriginalBody": true,
  "originator": "originator id",
  "body": [
    {
      "type": "TextBlock",
      "text": "Thank you for the response!",
      "wrap": true
    }
  ]
}
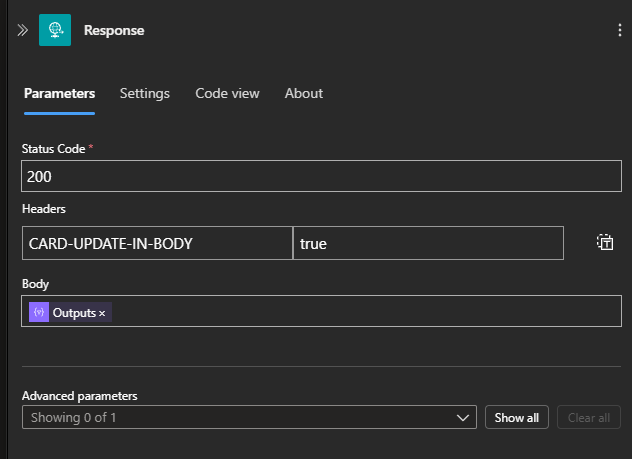
Next action is to send this update to the adaptive card. For this we need to make a Response action with the Status Code set to 200, the Headers set to "CARD-UPDATE-IN-BODY":true, and set our Body to the outputs value from our compose like shown here:
Which changes the adaptive card in outlook to look like this:
Now if we want to take our response from the user and make use of it, in example an azure automation runbook, we need to make another action called InitializeVariable. The name could be params, the type set to Object, and in the Value we can set it up in JSON to include our previous values from our logic app flow like this:
1
2
3
4
{
  "body": "@{body('Parse_JSON_Body')?['reason']}",
  "Token": "@{variables('Token')}"
}
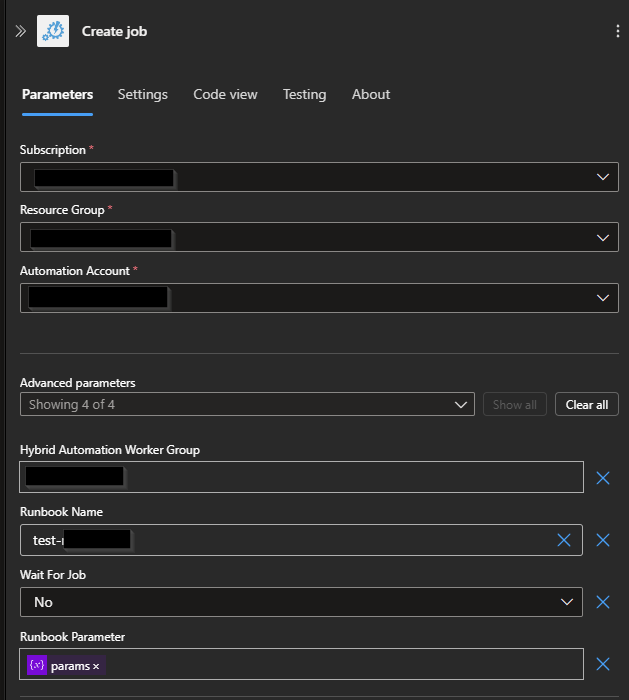
Lastly we can Create an Azure Automation Job with the action Create job. We can either choose a specific runbook already created and shown in our azure automation, and if it has parameters it will be shown as well. These could be filled in or you can specify a custom one, so in theory you could include the runbook name in the adaptive card body to be sent to the logic app in the first place and just use that. For this example we will just use a test runbook with no parameters. Now even though the runbook does not have any parameters we can still include the parameters we added by choosing Runbook Paramters in the Advanmced parameters dropdown example below:
Conclusion
Adaptive Cards sent with Microsoft Graph is a powerful way to present and collect information in a consistent way across different platforms. By using adaptive cards, you can improve the user experience and streamline approval processes for access requests, PTO requests, travel, bookings and so on. In general it can be a pain to get your adaptive card to work just right, along with the logic app and the runbook, but once it is running you do not have to touch it anymore and can spend time elsewhere, so I would definently say that the time invested will be paid back in full, and then some.
Reference/Documentation links
- Actionable Message Designer https://amdesigner.azurewebsites.net/
- Actionable messages in outlook https://learn.microsoft.com/en-us/outlook/actionable-messages/
- Actionable Email Developer Dashboard https://outlook.office.com/connectors/oam/publish Note you might have to have outlook on the web open first
- Admin dashboard for the Actionable Email Developer Dashboard https://outlook.office.com/connectors/oam/admin
- Microsoft Graph API: https://learn.microsoft.com/en-us/graph/api/overview
